Custom Cupcake Wrappers
Take a look below to see different examples and ideas for making your own custom cupcake wrappers.
You’ll be surprised to learn that with just a few simple supplies, you can quickly customize your cupcake wrappers and create uniquely personalized cupcake decorations for your friends and family.
Personal Message
Custom Cupcake Wrappers
Have something important you want to say? Turn that text into unique custom cupcake wrappers. Create any message for any occasion! Let your imagination run wild.
Materials/Supplies needed:
- Sturdy piece of scrapbook paper in color of your choice
- White paper (good quality that can be run through a laser or ink-jet printer)
- Contrasting color paper of your choice
- Thin 1/4″ ribbon in color of your choice
- Transparent Tape
- Glue Stick
Tools Needed:
- Straight or Scalloped-edged cupcake wrapper template (or cupcake wrapper die-cut for use with a scrapbook cutter like Cricut)
- 1/8″ Hole Punch
- Scissors
- Access to a computer and laser or ink-jet printer
Directions:
Step 1: Trace wrapper pattern onto your colored scrapbook or construction paper with pencil.
Step 2: Cut the pattern out of with scissors. If using a die-cut machine, cut wrapper pattern with die cut.
Step 3: On the computer, compose your personalized message. Print out your message on the white paper.
Step 4: Cut out message to form a long rectangular shape. Back the message with a piece of contrasting paper cut about 1/8” larger than the message paper. Attach message to color paper with glue.
Step 5: Punch two holes at the top of the message. Align the message on the cupcake wrapper, and re-punch the holes this time through the wrapper itself.
Step 6: Cut a piece of ribbon about 3” long. Thread ribbon through the holes and tie a bow to secure message in place.
Wrapper Variation: Instead of printing out a special message, commemorate a special date on your cupcake wrapper by printing them on stickers or pretty paper that you cut out with punches. Birth dates, anniversary or wedding dates—you can print whatever date you wish to celebrate! |
Favorite Photo Custom Cupcake Wrappers

Imagine celebrating that special person with his or her photo right on the wrapper. Our example is for graduation, but you can easily adapt this idea for wedding engagements, anniversaries, birthdays, or just about anything!
Materials/Supplies needed:
- Your favorite photo (scanned or jpeg format)
- Sturdy piece of scrapbook paper in color of your choice
(we chose black, but school colors is another option) - White paper (good quality that can be
run through a laser or ink-jet printer) - Contrasting Color paper of your choice
- 3-D Scrapbook graduation hat stickers
- Transparent Tape
- Glue Stick
Tools Needed:
- Straight-edged cupcake wrapper template
(or cupcake wrapper die-cut for use with a
scrapbook cutter like Cricut) - Scissors
- Access to a computer and laser or ink-jet printer
Directions:
Step 1: Trace wrapper pattern onto your colored scrapbook or construction paper with pencil.
Step 2: Cut the pattern out of with scissors. If using a die-cut machine, cut wrapper pattern with die cut.
Step 3: Format your photo in printing program of your choice on your computer. (We set the image to black and white.) Print out pictures on white paper.
Step 4: Cut out photos into nice squares using scissors. Back photo with a contrasting color paper. Attach photo to color paper square with glue.
Step 5: Assemble wrapper and use tape to hold in place if needed. Attach photo to front of wrapper. Finish by placing grad cap on the photo.
 Embellished Cupcake Wraps Photo Courtesy of Judy Wang |
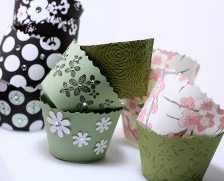
Embellishing a Wrap
Perhaps you found some cupcake wraps that are close to what you are looking for, but are missing something. You can customize a wrapper yourself with a few basic scrapbook techniques. Add a bow, secure a die-cut shape, or add some sparkle with rhinestones or jewels. How about stamping your wrapper? Or adding stickers? If you can think of it, you can add it to your cupcake wrap.
Monogramed
Custom Cupcake Wrappers
Recognize that special person in your life or celebrate wedded bliss with beautifully printed initial seals you can easily place on your cupcake wrappers. Materials/Supplies needed:
- Sturdy piece of scrapbook paper in color of your choice
- Ivory paper (good quality that can be run through a laser or ink-jet printer)
- Coordinating color paper of your choice
- Transparent Tape
- Glue Stick
Tools Needed:
- Straight or Scalloped-edged cupcake wrapper template
(or cupcake wrapper die-cut for use with a scrapbook cutter like Cricut) - Scissors
- 2″ Round Punch
- 1-1/4″ Round Punch
- Access to a computer and laser or ink-jet printer
Directions:
Step 1: Trace wrapper pattern onto your colored scrapbook or construction paper with pencil.
Step 2: Cut the pattern out of with scissors. If using a die-cut machine, cut wrapper pattern with die cut.
Step 3: On the computer, lay out your special initials or monogram. Print out your message on the ivory paper.
Step 4: Cut out initials with the 1-1/4″ punch. Punch out a 2” circle using the larger round punch from the coordinating color paper. Attach circle with the initials to the 2″ round in the coordinating color.
Step 5: Using tape or glue, attach layered initial or monogram to your cupcake wrapper.
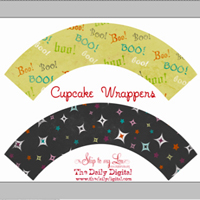 |
Digital Cupcake Wrapper
You wouldn’t believe it, but even cupcakes have moved into the «digital» age! Some of us don’t have a cabinet full of scrapbook paper or even the time to go down to the local craft store. If that’s the case with you and you’re digitally inclined and comfortable using Photoshop, try downloading this digital template for custom cupcake wrappers from Cindy Hopper at Skip to My Lou and giving it a try.
Join us on-line...